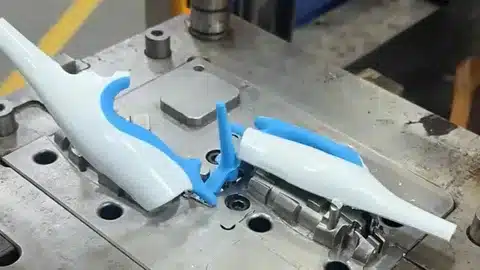
To achieve successful silicone overmolding or co-molding, it is important to select a material that balances adhesion, flow, curing, and compatibility with plastic or metal inserts to achieve functional performance and durability. Overmolding or co-molding requires the silicone to bond with plastics or metal inserts reliably without compromising flexibility, durability, or surface finish. The adhesion strength, curing profile, shrinkage behavior and adequate preparation of the surface of the insert are non-negotiable criteria during material selection. Make the wrong choice and you are liable to either delamination, voids, warping or even failure of the parts in the field.
It is still believed by many engineers that any high-quality silicone will bond well to inserts. In reality, material chemistry, curing technique, surface treatment, and the geometry of inserts are what really govern adhesion and the integrity of the surfaces and part over the long-term. The selection of the appropriate silicone to overmold or co-mold is important to guarantee functional adhesion, dimensional stability, and durability of the final product.
I have witnessed over fifteen years of specifying materials to be used in complex overmolded assemblies the difference a deliberate choice of silicone can make between prototypes that can endure validation and parts that ultimately fail a few weeks after launch. The following sections will take a tour of the practical considerations that are most important on the shop floor and in the lab.
Why Material Compatibility Matters in Overmolding
The chemical and mechanical compatibility of silicone with the insert material is necessary to assure adhesion and the long-term performance. In the absence of such compatibility, even the finest designed mold will yield parts that separate during thermal cycling or under the influence of mechanical load.
In the case of plastic inserts, e.g., ABS or polycarbonate, surface energy and chemical composition are the most critical factors. These materials usually need a plasma treatment, corona discharge or a primer to provide bonding sites to the silicone. Polypropylene and polyethylene, in its turn, have notoriously low surface energy, and thus, surface treatment is virtually always necessary before any silicone will be able to stick.
The metal inserts, be they aluminum, steel, or stainless, pose various challenges. Mechanical interlocking is enhanced by surface roughness caused by sandblasting or chemical etching; and the difference in thermal expansion between metal and silicone should be taken into consideration in the material selection. Covered metals provide an additional layer: the silicone grade should not react with the coating when curing.
The sole sure method of ensuring compatibility to cut steel to create production tooling is adhesion tests that are done on real samples of the insert. Flowable or adhesion promoting silicone grades should be used to bridge small compatibility gaps, but should never be considered a substitute to proper surface preparation.
To be able to make such decisions more quickly in the initial phases of a project, most teams consult some previously known compatibility charts. For a deeper dive into evaluating base materials, see HT Silicone’s guide to evaluating silicone.
| Insert Material | Silicone Compatibility Consideration | Recommended Strategy |
| ABS / PC plastics | Surface energy, chemical bonding | Use adhesion-promoting grade or primer |
| Polypropylene / PE | Low surface energy | Surface treatment required |
| Metals (Al, Steel) | Surface roughness, coating | Mechanical or chemical bonding optimization |
| Coated metals | Compatibility with coating | Select appropriate silicone grade |
| Multi-material inserts | Varying adhesion requirements | Test each interface individually |
Curing Profile, Shrinkage, and Part Geometry
Kinetics and shrinkage of inserts need to be synchronized with insert geometry to avoid stress and warp. The silicone curing is an exothermic reaction which produces measurable linear shrinkage- 0.5-2.5 percent, depending on grade. Differential shrinkage produces internal stresses that may crack the part or may over time delaminate as internal stress.
The thickness of walls, ribbing, hollows, etc., all have an effect on the way the shrinkage develops. A silicone rubber part over a very small metal part, such as can draw the metal part out of position during cooling. Undercuts or sharp corners in the complex insert geometry often traps air and results in voids unless a lower-viscosity, flowable silicone is selected and the mold is vented properly.
The quickest method of identifying these problems prior to production would be through prototype testing or flow simulation software. My experience has shown that a few days spent on a short-shot analysis and adhesion pull-test matrix save weeks of tooling rework in the future.
| Factor | Effect on Overmolding | Mitigation Strategy |
| Curing shrinkage | Stress at interface, potential delamination | Select low-shrinkage grade, adjust curing |
| Wall thickness | Uneven curing or flow | Optimize design, use flowable silicone |
| Complex geometry | Voids, trapped air | Adjust gates, venting, or flow-enhancing grade |
| Insert surface | Poor adhesion if smooth | Surface prep or primer |
Surface Treatment of Inserts
Correctly prepared surface of inserts improves adhesion and lessens chances of delamination. The correct treatment transforms a marginal bond into a strong bond that can withstand thermal shock, vibration and repeated flexing.
The best plastics are those that are treated by plasma or corona treatment, which increases the surface energy without necessarily adding extra steps in most automated lines. In cases where no plasma equipment is available or the plastic grade is highly variable, the primers are useful. Mechanical roughening of the plastic surface may also be beneficial, but may impair cosmetic requirements.
Metals are good respondents to sandblasting, acid etching or conversion coats. The desired effect is uniform micro-roughness that provides the silicone with something to hold on to without impacting the tolerances of the silicone itself. In the case of coated metals, the primer/silicone grade should be checked against the particular chemistry of the coating to prevent delamination at the coating-silicone interface.
All the decisions made on the surface treatment must be confirmed with adhesion tests at the exact temperature and mechanical loads that the part will experience in service. The peel test or lap-shear test conducted at room temperature and upper operating limit is a quick way to separate theoretical compatibility and real-world performance.
| Insert Type | Surface Treatment | Benefit |
| Plastic | Plasma, primer | Improve chemical bonding |
| Metal | Sandblasting, coating optimization | Mechanical/chemical adhesion |
| Coated surfaces | Primer or compatible silicone | Avoid delamination |
| Multi-material inserts | Individual surface prep | Ensure uniform adhesion |
Practical Silicone Material Selection Guidelines
Choose silicone grades that balance flow, adhesion, curing and mechanical properties to fit insert and design requirements. Hardness is just a single data point on the spec sheet, flowability, tear strength, compression set and adhesion promoters are often much more important in overmolding.
In thin-walled overmolds, a 2030 Shore A flowable grade is typically used to fill complex geometry with no voids. Particularly thicker parts or sections that require repeated compressions may require a 40-50 Shore A grade that has lower compressions. In the majority of cases, two-part platinum-cure systems are preferred due to their consistent properties and absence of by-products as seen with peroxide-cured silicones.
When using silicone, always compare the silicone datasheet with the thermal expansion coefficient of the insert material, and the anticipated operating temperature range. A material that is performing well at 23 C can fail miserably when it becomes brittle at -40 C, or softens too easily at 150 C.
| Selection Factor | Recommended Approach |
| Adhesion | Flowable or adhesion-promoting silicone |
| Hardness | Match functional requirement, consider compression set |
| Wall thickness | Optimize for flow and shrinkage |
| Part geometry | Ensure flow and adhesion throughout |
| Curing profile | Align with insert and design features |
| Surface finish | Compatible with coating or aesthetics |
| Testing | Prototype adhesion and flow test |

Common Mistakes in Overmolding and Co-molding
Failure is very likely to happen because of the neglected design or material. Having checked hundreds of returned parts and failed validation runs, the same few errors re-occur again and again:
- Came up with a standard off-the-shelf silicone with no adhesion testing done on the actual insert substrate.
- Ignoring the preparation of the insert surface since the last project was successful without any preparation.
- Not considering the shrinkage or differences in the wall-thickness of silicone and insert.
- Omission of prototype analysis of flow and bonding during realistic process conditions.
- Choosing a grade based on hardness alone rather than other properties such as adhesion or flow.
- The assumption of co-molding being successful without checking the curing and thermal compatibility of all the materials used.
All of them may be prevented with the help of a well-organized material-selection process and record keeping of the results prior to the release of tooling.
Checklist for Overmolding and Co-molding Silicone Material Selection
A checklist that is systematic provides assurance that material and design decisions limit defects and maximize durability. Ahead of the project, run through these questions and revise them just before the production release:
| Question | Purpose |
| Is silicone chemically compatible with insert? | Ensures adhesion |
| Has the insert surface been prepared properly? | Reduces delamination risk |
| Is curing profile compatible with insert? | Prevents stress and warping |
| Is wall thickness optimized for flow? | Avoids voids or uneven curing |
| Is geometry complex? | Adjust silicone grade, flowability, and venting |
| Has prototype testing confirmed adhesion and fill? | Validates material choice before mass production |
| Does material grade maintain elasticity and durability? | Ensures long-term performance |
Conclusion — Material and Design Must Work Together
The silicone materials used in overmolding and co-molding must be selected and the part designed in coordinated efforts. Adhesion, curing, flow, wall thickness, and geometry should be looked upon as a whole and not separately. The last evidence that the selected combination will provide defect-free and reliable production is the prototype testing.
To select silicone to overmold or co-mold, it is necessary to consider adhesion, curing, flow, wall thickness, and geometry together. A combination of silicone parts with plastic or metal inserts is achieved by proper choice of materials and part design to make the silicone parts durable, functional, and defect free. As these elements coincide the final outcome is a component that meets performance specifications and cost targets-which is exactly what all engineers and sourcing managers want to accomplish.